The 5-Step Process for Compression Shower Drain Installation
Imagine you have a stunning new shower pan ready to go, but the drain connection has you stalled. You don’t have a basement, and the crawlspace is a tight squeeze. This is the exact scenario where learning the ropes of compression shower drain installation saves the day. Unlike messy solvent-glued systems that require access from below, compression drains use a mechanical seal that you can fully complete from above the shower floor.
This approach is forgiving, requires fewer specialized skills, and works beautifully with steel, fiberglass, or acrylic shower bases. Before you begin, gather a hacksaw or plastic tubing cutter, 100% silicone caulk, channel-lock pliers, and the fitting tool that usually comes with your compression drain kit. With these tools in hand, you are ready to tackle the job in five straightforward steps.
Step 1: Measure and Cut the Drainpipe to the Correct Height
Getting the pipe height wrong is one of the most common mistakes in any compression shower drain installation. If the pipe is too tall, the shower base will rock. If it is too short, the compression gasket will have nothing to grip, leading to a leak.
The drainpipe should typically rise between 3/4 inch and 1 inch below the lip of the shower drain assembly. Always double-check the manufacturer’s instructions for your specific kit, as tolerances can vary slightly. A good trick is to temporarily set the shower base in place, mark the pipe where it meets the drain opening, and then remove the base to make your cut.
Use a plastic tubing cutter for the cleanest, most level cut. If you prefer a hacksaw, wrap a strip of masking tape around the pipe to act as a guide. This prevents the blade from wandering and keeps the cut square. After cutting, use a utility knife to deburr the inside edge of the pipe. Loose plastic shavings can interfere with the rubber compression gasket later.
Step 2: Secure the Drain Assembly to the Shower Base
Now you will attach the drain assembly to the shower pan itself. This part happens before the base is set into its final position. Start by applying a continuous, even bead of silicone caulk around the top flange of the drain opening on the topside of the shower pan. This bead prevents water from migrating under the drain flange later.
Insert the drain assembly into the hole from the top. From underneath the shower base, slide the rubber sealing washer and the cardboard friction washer onto the tailpiece. These two washers work together to create a tight, non-slip seal between the drain body and the shower pan material.
Thread the mounting nut onto the tailpiece from below and tighten it firmly using your channel-lock pliers. Be careful not to overtighten, especially if you are working with a fiberglass or acrylic base. These materials can crack or distort if you apply too much torque. Wipe away any excess silicone that oozes out from around the flange on the top side. A clean flange makes for a much nicer finished look.
Step 3: Lower the Shower Base into Position
This step feels a bit like threading a needle. You have a heavy shower base with a drain assembly attached, and it needs to land perfectly on a stationary pipe. Carefully lift the base and maneuver it into the alcove or over the subfloor.
Guide the drainpipe into the tailpiece of the drain assembly. If the base resists sitting flat, do not force it. Rock the base gently side-to-side to help seat the pipe. If it still will not settle down, the pipe is likely too tall. Lift the base back off and recheck your measurement from Step 1.
Once the base is resting flat on the subfloor, check that it is level and that the drain opening is centered. This is also a good moment to verify that the base is properly supported by mortar or a leveling compound underneath, as recommended by the manufacturer. A well-supported base prevents flexing and protects the drain connection.
Step 4: Create the Watertight Seal with the Compression Gasket
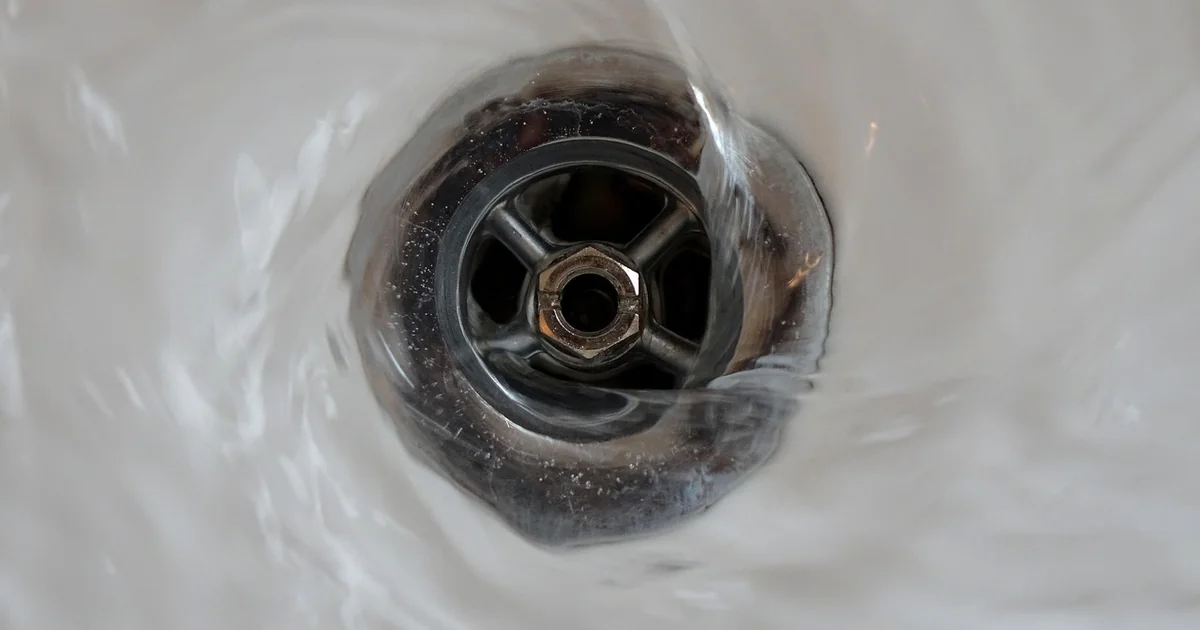
This is the heart of the compression shower drain installation. It is the moment where everything comes together without needing access to the space below. Look inside the drain opening from the top. You will see the drainpipe rising up through the tailpiece.
Take the soft rubber compression gasket and insert it down into the opening. It should fit snugly around the drainpipe and rest on the internal shoulder of the drain body. Next, place the compression nut on top of the gasket. This nut will have threading that matches the inside of the drain body.
You may also enjoy reading: 5 Flooring Types Experts Say Are More Trouble.
Here comes the clever part. Take the special fitting tool included with your drain kit and insert it into the opening so that it engages with the tabs on the compression nut. Use a standard screwdriver to turn the tool. As you tighten, the nut pushes downward, compressing the rubber gasket. This compression forces the gasket to expand tightly against the outer wall of the drainpipe, creating a perfectly watertight mechanical seal.
Tighten in stages. If the tool feels like it is binding, stop and check the alignment. A cross-threaded nut can ruin the gasket. Most compression nuts require about a quarter to a half turn past hand-tight to fully seat. Overtightening can deform the rubber, which defeats the purpose of the seal.
Step 5: Finishing Touches and the 24-Hour Cure
You are nearly done. Remove the fitting tool from the drain opening. Take the metal or plastic strainer grate and snap it into place on top of the drain. Make sure it sits flush with the surrounding surface so it does not become a tripping hazard or a place for soap to collect.
Your compression shower drain installation is mechanically complete, but the silicone caulk needs time to reach its full strength. Do not run water down the drain for at least 24 hours. Check the manufacturer’s instructions on your silicone tube, as some fast-curing formulas may require less time.
After the cure period, perform a simple leak test. Plug the drain and fill the shower base with a few inches of cool water. Let it sit for an hour. Then, inspect the space below the shower—whether that is a basement, a crawlspace, or the ceiling of the room below—for any signs of moisture. If everything is bone dry, your installation is a success and you can use the shower with complete confidence.
Why Compression Drains Are Often the Better Choice
Understanding the full value of a compression drain helps you appreciate why this method is so popular among DIY homeowners. The primary advantage is accessibility. Solvent-glued drains require you to glue the pipe to the drain body from below. If you do not have a basement or your crawlspace is too tight to move around in, a solvent weld becomes a serious obstacle. A compression drain eliminates this requirement completely.
Compression kits are also incredibly versatile. They are manufactured in ABS, PVC, and sometimes brass. PVC has become the standard choice because it is lightweight, resists corrosion, and is easy to cut. These kits work seamlessly with any shower base material, including steel, fiberglass, and acrylic.
Lastly, compression systems are forgiving. Solvent-glued joints are permanent. If you misalign the pipe, you have to cut it out and start over with a coupling. Compression joints are purely mechanical. If you make a mistake, you can simply disassemble the nut, adjust the pipe height or alignment, and reassemble. This lowers the stress level of the project considerably and makes a compression shower drain installation a smart, straightforward approach for anyone setting up a new shower.


