Your Path to Enormous Sweet Potatoes Starts Here
If you have ever tucked sweet potato slips into the ground and waited months only to unearth modest, skinny tubers, you know the disappointment well. It comes down to a handful of deliberate choices you make from the very beginning. Kevin from the Epic Homestead demonstrated this beautifully when he pulled truly giant sweet potatoes from his garden using a straightforward, repeatable method. Whether you have a sprawling backyard or a single large container on a patio, these seven steps will help you maximize your harvest this season.
1. Secure Superior Slips Before They Sell Out
Everything hinges on the quality of your starting material. A weak slip produces a weak plant, and a weak plant rarely delivers a biggest sweet potato crop. You have two reliable paths to obtain strong slips: purchasing them or growing your own. Both work well, but timing and variety selection matter immensely.
Order Early from Trusted Nurseries
Popular sweet potato varieties like Beauregard, Covington, and Japanese Murasaki often vanish from inventory well before spring arrives. Many reputable nurseries open pre-orders as early as January. If you wait until March or April, you may find only limited options remaining. Big box stores do carry slips, but their selection tends toward generic varieties that may not suit your local climate or taste preferences. Online specialty sellers and local farmer’s markets offer better diversity. When you order slips, aim to receive them roughly two to four weeks before your last expected frost date. This gives you time to pot them up and let them develop a sturdy root system before they go into the ground.
Grow Your Own Slips from a Single Tuber
If you missed the ordering window or simply want to save money, DIY slips are an excellent alternative. Take an organic sweet potato from your grocery store or saved from last year’s harvest and slice it in half lengthwise. Place both halves cut-side down in a shallow tray filled with moistened seed-starting mix or even just water. Cover the tray with a clear plastic lid to create a humid environment and set it under grow lights or on a sunny windowsill. Change the water daily if you use the water method. Within two to three weeks, small shoots will emerge from the surface of the potato. Once each shoot develops several leaves, gently twist or cut it free and place it in a small pot of soil. Keep these young plants indoors for another couple of weeks so their roots can establish. By the time your garden soil warms up, you will have vigorous, ready-to-plant slips at no extra cost.
2. Prepare Soil That Lets Roots Run Deep
Sweet potatoes are root crops, and their underground growth is directly limited by the soil they sit in. Hard, compacted earth or heavy clay forces tubers to stay small and misshapen. The goal is to create a loose, friable environment where roots can expand freely. This single step is often the difference between a mediocre harvest and a biggest sweet potato crop.
Dig your planting bed to a depth of at least 12 inches. Incorporate generous amounts of well-aged compost throughout that entire depth. Compost improves drainage in heavy soils, adds slow-release nutrients, and encourages beneficial microbial activity. If your native soil is predominantly clay, add perlite or agricultural grit at a ratio of about one part amendment to three parts soil. This prevents water from pooling around the developing roots, which can cause rot and stunted growth. Raised beds work exceptionally well for sweet potatoes because they naturally provide loose, deep soil. Even if you only have six inches of loose soil above a hard sublayer, that six inches can still produce a remarkable crop as long as the roots have room to spread horizontally.
3. Space Slips Generously for Unrestricted Growth
Crowding is one of the most common mistakes home gardeners make with sweet potatoes. Each plant needs room to send out sprawling vines and develop tubers underground. When slips are packed too close together, they compete for water, nutrients, and sunlight. The result is a patch of undersized potatoes rather than the biggest sweet potato crop you envisioned.
Plant your slips approximately 12 inches apart in rows that are three to four feet apart. This spacing gives each vine enough territory to spread without shading its neighbors. In container growing, limit yourself to two or three slips per 15-gallon pot. A 20-gallon container can handle three slips comfortably, but anything beyond that leads to overcrowding. Remember that the visible vine growth above ground hints at the root expansion below. If the vines look cramped, the tubers almost certainly are too.
4. Apply a Weed-Free Mulch from the Start
Weeds are more than an eyesore in a sweet potato patch. They steal moisture and nutrients from the soil and can physically crowd out young slips during the critical first few weeks after transplanting. A thick layer of mulch solves multiple problems at once. It blocks weed seeds from germinating, locks in soil moisture so you water less frequently, and moderates soil temperature during hot summer spells. Epic Organic Garden Straw is one excellent option because it is certified weed-seed-free, meaning you will not inadvertently introduce new weed problems while trying to suppress existing ones.
Apply a two- to three-inch layer of straw around each slip after planting, extending the mulch outward as the vines grow. Avoid piling mulch directly against the stems, as this can trap moisture and invite rot. The stable environment created by consistent mulching encourages the roots to keep expanding steadily rather than stopping and restarting with each temperature swing or dry period. Steady growth is precisely what produces larger tubers.
You may also enjoy reading: Make a Toad Abode to Get Rid of Slugs: 7 Ways.
5. Water Deeply and on a Reliable Schedule
Sweet potatoes are surprisingly drought-tolerant once established, but inconsistent watering dramatically reduces final size of your harvest. When the soil dries out completely, the plant shifts energy away from root development and into survival mode. When water returns, growth resumes but rarely catches up to the potential it would have had with steady moisture.
During the first three weeks after transplanting, keep the soil consistently moist but not waterlogged. This helps the slips establish a strong root network. After that, aim for about one inch of water per week from rainfall or irrigation. A soaker hose or drip system works best because it delivers water directly to the root zone without wetting the foliage, which reduces the risk of fungal diseases. In sandy soils, you may need to water twice per week. In clay-heavy soils, once per week is usually sufficient. Check the soil moisture by inserting your finger two inches deep near the base of the plant. If it feels dry at that depth, it is time to water.
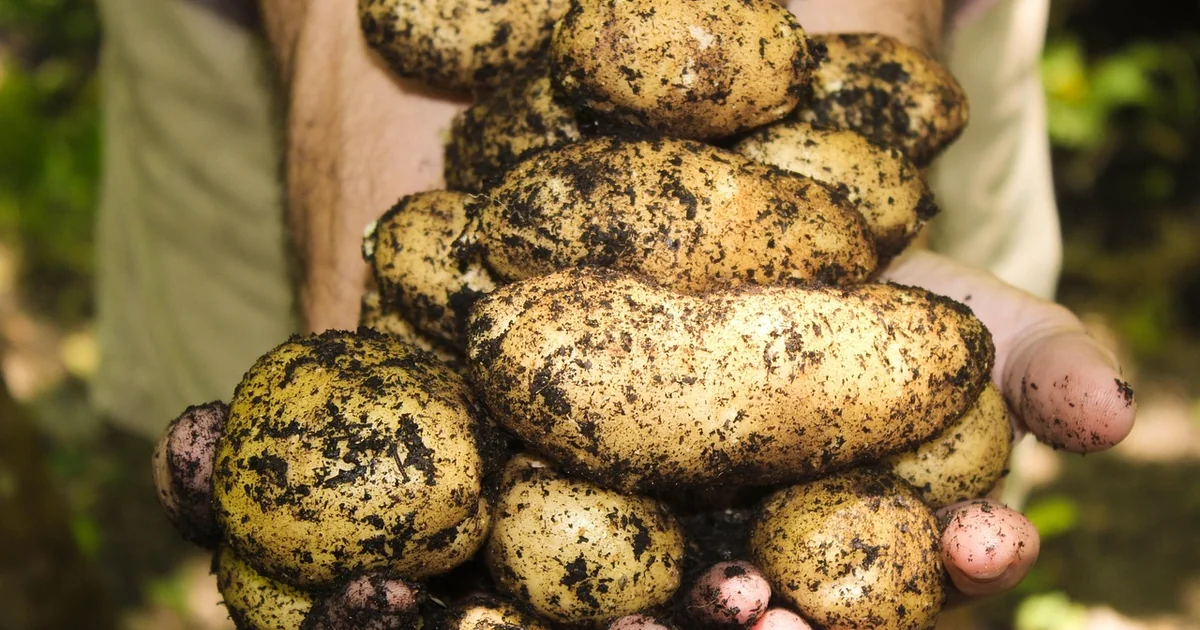
6. Harvest at Peak Maturity for Maximum Size
Patience is a virtue when growing sweet potatoes, but waiting too long has its own risks. Sweet potatoes reach their full size between 90 and 120 days after planting, depending on the variety and your local growing conditions. The signal to start checking is when the lower leaves on the vines begin to yellow. This indicates the plant is redirecting energy from foliage into the storage roots below.
Gently dig into the soil near the base of the plant with your hands or a garden fork, being careful not to puncture any tubers. If the potatoes have reached a usable size, you can harvest the entire crop at once or take a few early potatoes and leave the rest to keep growing. In mild climates where frost is not a concern, you can leave sweet potatoes in the ground for several weeks after the leaves yellow. However, if a hard frost is forecast, harvest immediately. Chilled tubers develop a bitter taste and do not store well. For the biggest sweet potato crop, wait until the majority of the potatoes feel firm and have filled out their shape, but do not delay past the first frost warning.
7. Grow in Containers When Ground Space Is Limited
Not everyone has a dedicated garden bed with deep, loamy soil. Container growing is a perfectly viable method for producing a biggest sweet potato crop in small spaces. The key is choosing a container that is wide and deep enough to accommodate the sprawling root system. A 15-gallon fabric pot or plastic nursery pot is the minimum size for a single plant. For two or three plants, step up to a 20-gallon container or larger.
Fill the container with a high-quality potting mix rather than garden soil, which compacts too heavily in pots. Add a slow-release organic fertilizer at planting time to provide steady nutrition throughout the growing season. Place the container in a location that receives full sun for at least six hours per day. Water more frequently than you would in the ground because containers dry out faster, especially during hot weather. Check moisture levels every other day and water whenever the top inch of soil feels dry. Harvesting from containers is actually easier than from in-ground beds because you can simply dump the entire pot out and collect the tubers without digging.


