If you’ve ever wondered how to grow cannabis, you might be surprised to learn that cannabis cultivation follows a similar rhythm to growing tomatoes in your backyard. Like those warm-season garden staples, cannabis thrives when planted after the last frost and given plenty of sunshine and consistent care. For most beginners, outdoor planting is the smartest starting point — it’s easier to manage and far less expensive than setting up an indoor grow room. This guide walks you through the entire process in seven straightforward steps, from starting healthy seeds to harvesting and processing your plants. Whether you are new to gardening or have a green thumb, these practical pointers will help you build confidence and get rewarding results from your first season.
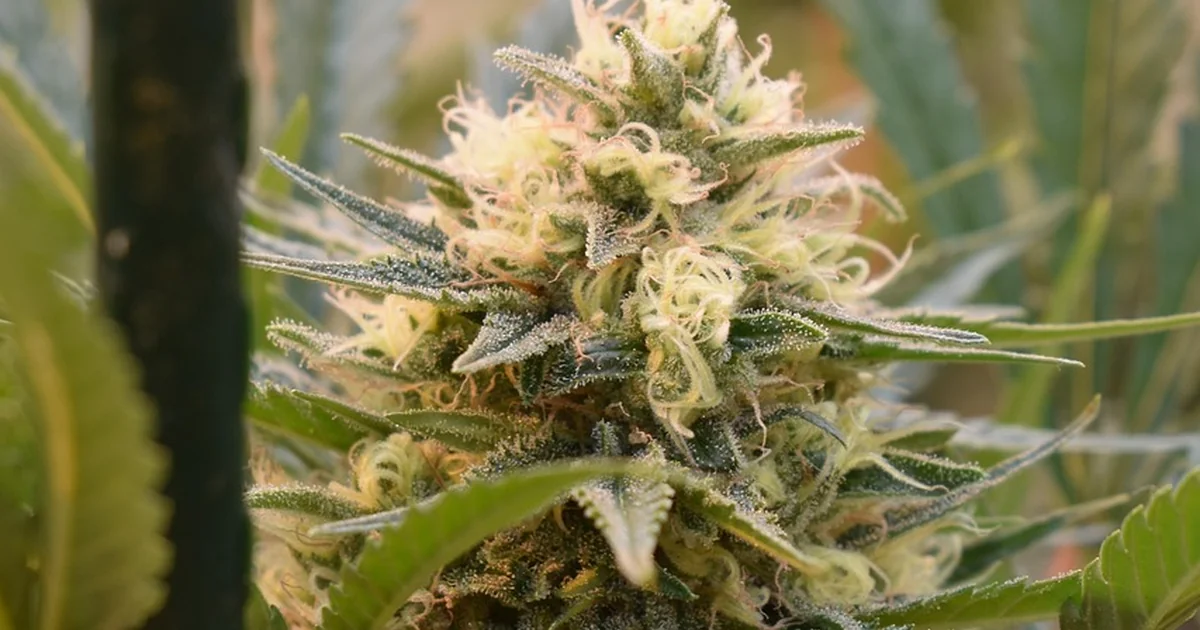
Step 1: Choose Your Cannabis Plant Type and Timing
Your first decision will set the tone for everything that follows. The type of cannabis plant you choose—photoperiod or autoflower—determines your entire growing schedule. Photoperiod plants rely on changes in light cycles to begin flowering, while autoflowers start blooming automatically after a set period, regardless of light. Understanding this difference between photoperiod vs autoflower is essential for learning how to grow cannabis effectively. Each seed type brings its own rhythm, so think about the time and space you have available before you buy your seeds.
When it comes to timing, outdoor planting should occur after the last frost, when nighttime temperatures stay above 55°F (13°C). This gives your plants a warm start and reduces risk of cold damage. Indoor seeds, on the other hand, can be started any time of year, as long as you provide consistent light and temperature. Considering the best time to plant cannabis in your area will help you match your chosen seed type with the right season. Whether you plan a sunny garden patch or a cozy indoor setup, knowing these basics about cannabis seed types and their light preferences will save you headaches later on. A little planning now makes the entire process smoother from the very first sprout.
Step 2: Germinate Your Cannabis Seeds
Now that you have your seeds and understand their light needs, it is time for the first truly exciting moment: getting them to sprout. Germination is the critical step where your cannabis seed transforms into a seedling, and there are a few simple, reliable methods to make it happen. You can either plant the seed directly into its growing medium or sprout it first using a separate technique. Many home growers find that pre-sprouting gives them more control and a clearer view of which seeds are viable.
One of the most popular seed germination methods involves soaking the seeds in warm water or placing them inside a damp paper towel. Keep them in a warm, dark spot and check daily until a small white root, called the taproot, emerges. Once you see that root, it is time to plant. Gently place the sprouted seed into a small pot, about 4 to 6 inches wide, with the taproot pointing downward. Bury it roughly 1 to 2 cm deep. Make sure your container has drainage holes so the soil does not become waterlogged. Starting in a smaller pot helps you control moisture and warmth, and you can always move the seedling to a larger container as it grows. Learning how to germinate cannabis seeds with this gentle approach gives your plant a strong, healthy start.
Step 3: Transplant Seedlings to Larger Containers or Garden Beds
Once your seedlings have a few true leaves, it’s time to give them more space. This is a key moment in learning how to grow cannabis successfully. If you started seeds in a small pot (about 4 to 6 inches wide), move each seedling into a larger container with drainage holes. A bigger pot allows the roots to spread and prevents them from becoming root-bound. For outdoor growing, space plants about 3 to 6 feet apart, depending on how large you expect them to become. Good airflow between plants helps reduce mold and pests.
Hardening Off Indoor Seedlings
If you plan to move indoor seedlings to an outdoor garden, you need to harden them off first. This means gradually exposing them to outdoor conditions over a week or so. Start by placing them outside for just a few hours in a sheltered spot, then slowly increase the time and direct sunlight. This gentle transition prevents shock and sunburn. Remember, transplanting cannabis at the right time and with care sets the stage for strong, healthy plants.
Step 4: Manage the Vegetative Growth Stage
Once your seedlings are settled in their new home, the vegetative phase begins. This is when your plants focus entirely on growing strong stems and plenty of leaves. To learn how to grow cannabis successfully, you need to understand the cannabis vegetative stage and its demands. Light is the biggest factor here. Indoor growers use an 18/6 cannabis light cycle, meaning 18 hours of light followed by 6 hours of darkness. This schedule encourages rapid, healthy growth. Outdoor plants, meanwhile, rely on the natural long days of summer. They will thrive as long as they receive plenty of direct sunlight each day.
Nutrition also plays a key role during this stage. Your plants need balanced nutrients to support all that new growth. Keep an eye on your cannabis nutrients pH levels, as the right pH helps roots absorb what they need. A simple soil test can tell you if adjustments are needed. With the right light and feeding routine, your plants will grow bushy and strong, ready for the next phase.
Step 5: Initiate Flowering by Adjusting Light Cycles
Once your plants are strong and bushy, it is time to shift their focus from leafy growth to bud production. To trigger the cannabis flowering stage, you need to change the light schedule. For indoor growers, this means switching to a strict 12/12 light cycle — 12 hours of light followed by 12 hours of uninterrupted darkness. This mimics the natural shortening of days in late summer, telling your plants it is time to flower. Consistency matters here; even a brief light leak during the dark period can confuse your plants and delay or reduce bud development.
Also worth a read: 7 Vegetable Garden Ideas for a Great Harvest.
If you are growing outdoors, nature handles the timing for you. As the days naturally grow shorter after the summer solstice, your plants will begin to flower on their own. A key part of learning how to grow cannabis successfully is knowing how to identify male vs female cannabis plants during this stage. Male plants develop small, pollen-filled sacs, while females produce the white hairs (pistils) that will become buds. Remove any male plants as soon as you spot them to prevent pollination. Pollinated females stop putting energy into bud growth and instead produce seeds, which lowers both yield and quality. Check your plants daily during the first two weeks of flowering to catch males early. With the right light schedule and careful plant management, you set the stage for a generous harvest.
Step 6: Care for Plants During the Flowering Stage
The flowers are forming, and your daily attention to detail becomes more important than ever. Understanding how to grow cannabis successfully means adapting your care routine as the plant shifts into flowering mode. For cannabis flowering nutrients, you will need to reduce nitrogen while increasing phosphorus and potassium. This change tells the plant to focus energy on bud production. Cannabis humidity during flowering deserves special attention — keeping moisture levels in a comfortable range helps prevent mold from developing on the dense buds. Temperature should stay steady, as stress from fluctuations can affect both yield and quality. Cannabis pest control is another priority at this stage. Check the undersides of leaves and the developing buds for signs of insects or disease. Early detection gives you the best chance to handle problems without harsh measures. By staying consistent with these practices, you support healthy bud development and set yourself up for a satisfying harvest.
Step 7: Harvest and Process Your Cannabis
Now you have guided your plants through the vegetative stage and into flowering, it is time for the final step. Knowing exactly when to harvest makes a real difference in the quality of your buds. Your plants will give you clear visual cues. Look closely at the tiny, resinous glands called trichomes. When they shift from clear to a milky or amber color, your cannabis is ready. You can also check the pistils — the small, hair-like structures on the buds. As they darken and curl inward, that is another sign that harvest time is near.
Once you have determined the right moment, cut the branches and remove the larger fan leaves. Then comes the crucial stage of drying and curing cannabis. Hang the branches upside down in a cool, dark space with good airflow. This slow drying process preserves the aroma and potency. After the stems snap rather than bend, you can trim the buds more closely and place them in airtight jars for curing. Open the jars daily for the first week to release moisture. Proper post-harvest processing, including careful trimming and storage, gives you smooth, flavorful buds that are a joy to use. With patience and attention to detail, you have now completed the full cycle of how to grow cannabis from seed to harvest.
Executive Summary: Key Takeaways for Grow Cannabis
Mastering Grow Cannabis requires harmonizing botanical soil biology, moisture retention, and seasonal crop cycles. Key pillars of this guide include:
- Soil Ecosystem Architecture: Incorporating biologically active finished compost and perlite to maintain an optimal 6.2–6.8 pH range.
- Hydration Efficiency: Transitioning from shallow daily spraying to deep, bi-weekly root-zone soaking to build extensive vascular drought resistance.
- Organic Companion Defense: Cultivating beneficial insectary plants that naturally eliminate aphids and foliage pests without synthetic chemicals.
- Succession Planning: Staggering sowing cycles every 14 to 21 days to ensure sustained harvest yields throughout the entire growing season.
Comprehensive Horticultural Matrix: Grow Cannabis
Achieving consistent, high-yield vitality with Grow Cannabis requires understanding how environmental parameters intersect across different growth stages. The structured matrix below provides an operational framework for modern home gardeners:
| Operational Stage | Horticultural Objective | Essential Soil & Tool Inputs | Optimal Timing Cadence | Primary Health Metric |
|---|---|---|---|---|
| 1. Soil Inoculation & Aeration | Establish rich mycorrhizal fungi networks and pore structure. | Broadfork, organic aged manure, worm castings, coarse horticultural sand. | Early Spring / 3 weeks before planting | High crumb structure & water permeability |
| 2. Transplanting & Root Anchorage | Prevent transplant shock and encourage downward vertical root growth. | Liquid kelp root stimulator, clean trowel, untreated cedar bark mulch. | Overcast mornings or late afternoons | Zero stem wilting; active leaf turgor |
| 3. Vegetative Canopy Development | Maximize photosynthetic surface area while ensuring internal air circulation. | Organic fish emulsion, balanced 5-5-5 organic granular food, pruning snips. | Mid-vegetative growth spurt | Deep green foliage without fungal blemishes |
| 4. Reproductive & Fruit Set | Direct energy from foliage development toward robust flower and fruit production. | Bone meal, phosphorus-rich rock dust, calcium-magnesium foliar spray. | First sign of flowering buds | High blossom retention; vigorous pollination |
| 5. Post-Harvest Bed Renewal | Replenish depleted micro-nutrients and protect bare soil from erosion. | Cover crop seed (crimson clover/winter rye), shredded deciduous leaves. | Immediately following final seasonal harvest | Protected winter biology; zero topsoil runoff |
Advanced 5-Stage Implementation Roadmap for Grow Cannabis
To successfully transition theoretical horticultural knowledge into thriving, disease-resistant plant life, implement the following rigorous five-stage roadmap developed by seasoned master gardeners:
Stage 1: Conducting Detailed Micro-Site Diagnostics
Residential landscapes are not uniform environments; they are dynamic mosaics of localized temperature, wind, and moisture fluctuations. Before planting or reorganizing around Grow Cannabis, spend several days mapping your garden space. Note where morning condensation lingers longest—an indicator of reduced airflow that may predispose plants to fungal blight. Verify sunlight trajectories at 9:00 AM, 1:00 PM, and 5:00 PM to distinguish between intense full-sun exposure and gentler dappled light. Dig test pits 12 inches deep to evaluate subsoil compaction; if water takes longer than 30 minutes to drain from a filled hole, install raised beds or integrate coarse organic compost to prevent root rot.
Stage 2: Precision Nutrient Profiling and Microbiome Health
Healthy plants are the natural byproduct of thriving soil biology. Rather than relying on synthetic quick-release fertilizers that provide a temporary nitrogen surge followed by mineral leaching, focus on feeding the subterranean soil web. Apply well-composted organic matter alongside mycorrhizal inoculants during planting. Mycorrhizae form symbiotic relationships with plant root systems, effectively expanding their root surface area up to one hundredfold, which dramatically improves phosphorus absorption and water uptake during midsummer dry spells.
Stage 3: Hydro-Zoning and Moisture Optimization
Water management is the single most critical factor determining garden health. Implement hydro-zoning by clustering species with identical moisture requirements together, preventing the common trap of overwatering drought-tolerant herbs while dehydrating thirsty vegetables. Install low-pressure drip irrigation tubing equipped with pressure-compensating emitters directly adjacent to root crowns. Cover all exposed soil with a 2-to-3 inch blanket of shredded organic mulch, leaving a clear two-inch buffer around plant stems to deter collar rot and burrowing insect pests.
Stage 4: Integrated Ecological Pest Stewardship
Rather than declaring war on all insects, establish an ecological balance. Pests like aphids and spider mites flourish when natural predator balances are disrupted. By intentionally cultivating companion flowering herbs—including sweet alyssum, French marigolds, dill, and coriander—you provide nectar reserves that sustain beneficial predatory insects like hoverflies, green lacewings, and minute pirate bugs. When pest outbreaks do occur, employ mechanical controls (such as a forceful jet of water) or mild potassium-salt insecticidal soaps applied at dusk before escalating to stronger treatments.
Stage 5: Seasonal Pruning, Sanitization, and Crop Rotation
Sustained botanical vigor requires diligent garden hygiene. Deadhead spent blossoms promptly to stimulate continuous flower production and channel energy away from unwanted seed production. When pruning, always use bypass pruners sterilized in a 70% isopropyl alcohol solution between distinct plants to prevent cross-contamination of bacterial wilts. Practice a strict 3-to-4 year crop rotation for heavy feeders (such as nightshades and brassicas), ensuring that soil-borne pathogens naturally diminish over successive growing seasons.
Common Gardening Pitfalls to Avoid
- Over-Fertilizing with Nitrogen: Excessive nitrogen stimulates lush, tender vegetative foliage at the expense of floral development, rendering stems highly attractive to sap-sucking pests.
- Shallow Overhead Evening Sprinkling: Wetting foliage right before dark creates prolonged leaf wetness, providing optimal conditions for powdery mildew and anthracnose to germinate.
- Planting Too Deeply: Burying root flares or root crowns below surrounding soil levels suffocates roots and causes stem decay. Always align root flares flush with ground level.
- Ignoring Seasonal Soil Compaction: Walking on damp garden beds compresses soil pore spaces, starving roots of vital oxygen. Always work from designated stepping stones or access paths.
Frequently Asked Questions About Grow Cannabis
What is the single most effective way to start with Grow Cannabis?
Begin with rigorous soil testing and site preparation. Amending native soil with finished organic compost and ensuring 6+ hours of unobstructed sun exposure eliminates over 80% of common gardening frustrations before seedlings even enter the ground.
How do I identify whether my garden is overwatered or underwatered?
Both conditions cause leaf discoloration, but underwatered foliage feels dry, brittle, and crisp, whereas overwatered plants exhibit yellowing lower leaves that feel soft and limp, accompanied by damp, oxygen-deprived soil at root level.
Can I apply these gardening principles to container gardens and raised beds?
Absolutely. In fact, raised beds and containers offer superior soil drainage and faster spring warming. Use a high-quality soilless potting blend enriched with perlite and organic worm castings, and increase watering frequency during midsummer heat.
What organic fertilizers yield the best results for long-term soil health?
Opt for slow-release organic amendments such as composted chicken manure, alfalfa meal, kelp meal, and bone meal. These feed beneficial soil microbes steadily rather than causing volatile chemical spikes.
How do I protect my garden from late spring or early autumn frosts?
Erect lightweight floating row covers or frost blankets suspended over wire hoops. Water the soil thoroughly the afternoon prior to a predicted frost, as moist soil holds and radiates thermal heat significantly better than dry earth.