When you finally decide to give your home a fresh look, excitement often mixes with a touch of anxiety. You might picture a gleaming new kitchen or a spa-like bathroom, but you probably also worry about cost overruns, delayed timelines, and unexpected problems. The difference between a smooth renovation and a stressful one usually comes down to one thing: preparation. Solid house renovation planning removes guesswork and turns your vision into a manageable process. Let us walk through five essential steps that will help you stay organized, protect your budget, and keep your sanity intact.
Step 1: Define Your Vision and Scope
Before you pick up a paintbrush or call a single contractor, you need a clear picture of what you want to accomplish. House renovation involves cosmetic changes that enhance a home’s look and usability — this is different from structural remodeling, which alters load-bearing walls or the home’s footprint. Knowing this distinction saves you from confusion later.
Start with a Goal List
Grab a notebook or open a digital document and write down every change you dream of making. Do you want to swap out old kitchen cabinets? Replace bathroom fixtures? Update flooring throughout the main level? Be as specific as possible. A vague goal like “make the kitchen nicer” leads to vague results and budget surprises. Instead, write “replace laminate countertops with quartz” or “install a farmhouse sink.”
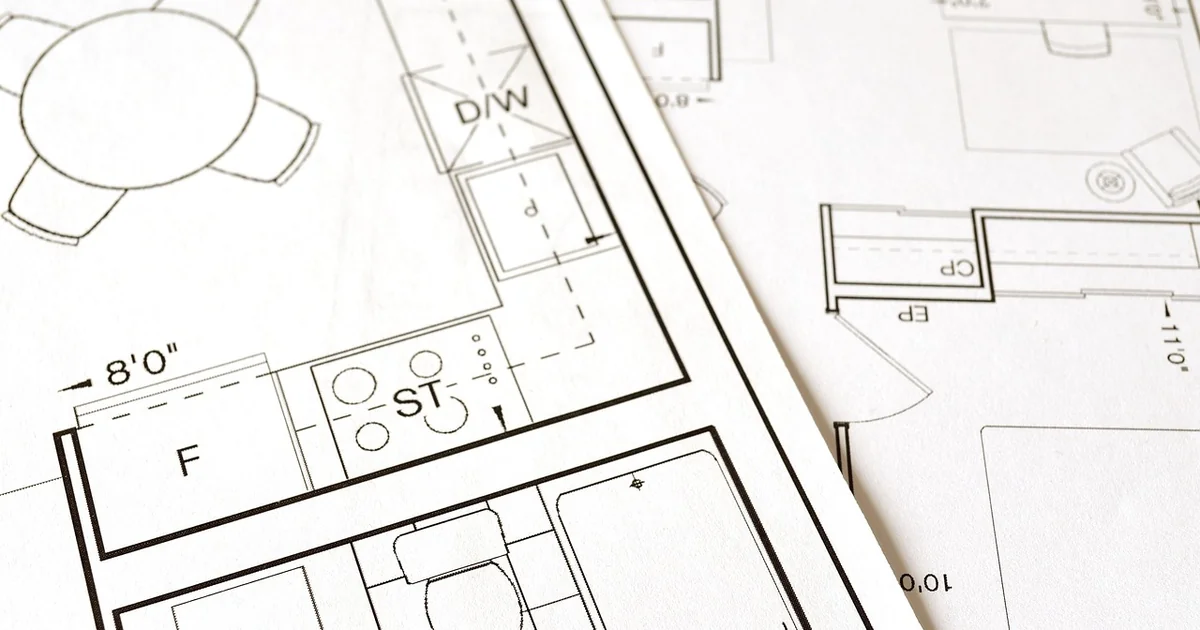
Sketch Your Ideas
You do not need to be an artist to create a basic layout. Use online design tools or graph paper to map out the space. Measure walls, windows, and doors so your sketch reflects real dimensions. This visual step helps you spot problems early — like a refrigerator door that would block a walkway or a vanity that is too wide for the bathroom. Many homeowners discover that their initial vision needs tweaking once they see it on paper.
Decide DIY vs. Contractor-Handled Work
Be honest with yourself about your skills and available time. Painting a bedroom, installing new light fixtures, or laying peel-and-stick tile might be within your reach. But plumbing, electrical work, and major structural changes require licensed professionals. List which tasks you plan to do yourself and which ones need a contractor. This clarity helps when you start gathering quotes and setting a timeline.
A 2019 survey by the National Association of Home Builders found that about 32% of homeowners who started renovations underestimated the complexity of DIY projects, leading to delays and additional costs. Knowing your limits upfront prevents that frustration.
Step 2: Establish a Realistic Budget
Money conversations are rarely comfortable, but skipping them leads straight to disaster. Your budget determines the materials you can choose, the size of your project, and whether you need outside funding. House renovation planning without a firm budget is like driving without a map — you will end up somewhere, but probably not where you intended.
Understand the Cost per Square Foot
On average, home renovations cost between $15 and $60 per square foot. That range seems wide because it is — your location, material choices, and project scope all move the needle. For a house between 1,250 and 1,600 square feet, the national average falls around $52,040, but high-end renovations can climb to $189,000 or more. These numbers come from real project data collected by remodeling industry groups, not guesses.
Factor in Hidden Costs
Many first-time renovators forget about permits, dumpster rentals, temporary housing, and unexpected surprises behind walls. Set aside 10 to 20 percent of your total budget as a contingency fund. If you plan to spend $50,000, keep an extra $5,000 to $10,000 available. That cushion covers problems like rotten subflooring, outdated wiring, or a discontinued tile that forces a last-minute substitute.
Explore Funding Options
Cash works well for smaller projects — think a bathroom refresh, new flooring, or a modest kitchen update. But whole-home renovations typically exceed what most people have in savings. Here are the most common funding routes:
- Unsecured home improvement loans: These typically lend between $50,000 and $100,000. They close quickly for qualified borrowers, but interest rates run higher than secured options.
- Home equity lines of credit (HELOC): These use your home’s value as collateral, so rates tend to be lower. However, the application process takes longer, and your home is at risk if you cannot make payments.
- Personal savings: No interest, no paperwork, but draining your emergency fund is risky. Only use savings if you have a separate safety net for life’s surprises.
Compare offers from at least three lenders before deciding. A difference of one or two percentage points on a $60,000 loan adds up to thousands of dollars over time.
Step 3: Research and Hire the Right Contractor
Your contractor becomes your partner for the duration of the project. Choosing poorly leads to shoddy work, blown budgets, and legal headaches. Taking time to vet candidates is one of the smartest investments you can make in your house renovation planning process.
Build a Shortlist of Candidates
Start by asking friends, neighbors, and local hardware store employees for recommendations. Then search online for contractors with strong reviews and a solid portfolio. Look for specialists who have completed projects similar to yours. A contractor who excels at kitchen remodels might not be the best fit for a full-house renovation.
Ask the Right Questions
When you contact potential contractors, come prepared with a list of questions:
- Are you licensed and insured? Ask for proof of both.
- Can you provide references from recent clients? Call at least three.
- How do you handle change orders? A clear process prevents scope creep.
- Who will be on-site daily? You want to know if the owner supervises or a foreman does.
- What is your estimated timeline? Compare this to your own rough schedule.
Get Multiple Quotes
Collect at least three written estimates. Do not automatically choose the lowest bid — it often means corners will be cut. Look for a quote that falls in the middle range and comes from a contractor who communicates clearly and answers your questions directly. If someone seems cagey or talks in circles during the interview, trust that instinct and move on.
Check Credentials Thoroughly
A reputable contractor holds current licensing for your state or locality, carries general liability insurance, and provides workers’ compensation coverage. Verify these documents yourself. You can usually check license status through your state’s contractor licensing board website. About 37% of homeowners who skipped this verification later regretted it, according to a 2022 survey by the National Association of the Remodeling Industry.
Step 4: Navigate Building Codes and Permits
Building codes exist to keep your home safe. They regulate everything from electrical wiring to plumbing drainage to window egress in bedrooms. Ignoring them can result in fines, forced removal of completed work, or trouble selling your home later. Proper house renovation planning always includes a thorough review of local requirements.
You may also enjoy reading: 33 Stylish Wedding Registry Gift Ideas 2026 Brides Love.
Learn What Requires a Permit
Most jurisdictions require permits for electrical work, plumbing changes, structural modifications, and major HVAC installations. Cosmetic updates like painting, flooring, and cabinet replacements usually do not need permits, but always check with your local building department. Rules vary widely from city to city.
Decide Who Handles Permits
If you hire a general contractor, they typically pull the permits and schedule inspections. This is a major advantage because they know the process and have relationships with inspectors. If you plan to do some work yourself, you will need to apply for permits as an owner-builder. That means handling applications, scheduling inspections, and closing out permits on your own — a time-consuming responsibility that can take weeks or months.
Plan for Inspection Delays
Inspectors are busy, especially during peak construction seasons. You might wait several days for an appointment, and if the work fails inspection, you will need to correct it and schedule a re-inspection. Build this buffer into your timeline. The average renovation involves three to six inspections depending on the scope, so a two-week delay per inspection can stretch your project by months.
Structural carpenter work, electrical rough-in, plumbing rough-in, insulation, and final finishes each typically require a separate inspection. Plan accordingly.
Step 5: Create a Detailed Timeline and Anticipate Delays
A timeline transforms your renovation from a wish into a schedule. It tells you when to order materials, when workers will arrive, and when you can expect to sleep in your own bed again. But a timeline is only useful if it accounts for the real-world delays that plague almost every project.
Map Out the Sequence of Work
Most renovations follow a logical order. Demolition comes first, then structural work (if any), followed by rough-in for electrical, plumbing, and HVAC. After that comes insulation, drywall, painting, flooring, trim, and finally fixtures and finishes. When you understand this sequence, you can see why ordering a custom vanity in week one is smart — it might take eight weeks to arrive, and you will need it near the end.
Identify Common Stalling Points
Projects stall when fixtures, appliances, or materials get discontinued or back-ordered. A discontinued tile forces a new selection, which might mean reordering and waiting weeks. Subcontractors who fall behind on other jobs push your timeline to the right. About 28% of renovation delays in a 2023 industry study were tied to material availability alone.
To protect yourself, order long-lead items as early as possible. Confirm stock status before you commit to a timeline. Ask your contractor which materials they have seen cause delays recently, then adjust your plan accordingly.
Build in Buffer Time
Even the best-laid schedules slip. Add one to two weeks of buffer time for every month of projected work. If your contractor says the project will take three months, plan for four. That way, if things go smoothly, you are pleasantly surprised. If delays hit, you are not scrambling.
A concrete timeline developed with your contractor should include start and end dates for each phase, not just the final handover. Review it weekly together and adjust as needed. Good contractors provide regular updates, and you should expect them to communicate clearly about any changes.
Bringing It All Together
Planning a home renovation is not glamorous work. It involves spreadsheets, phone calls, permit applications, and tough budget decisions. But every hour you invest in preparation saves you ten hours of headache during construction. Solid house renovation planning turns a potentially chaotic process into a series of manageable steps. You define what you want, determine what you can afford, hire people you trust, follow the rules, and build a timeline that leaves room for life’s inevitable surprises. The result is a home that looks and functions the way you imagined — without the nightmare stories that scare so many people away from renovating at all.


