Wasps are fiercely territorial creatures. A scouting queen will avoid settling near an existing nest because the risk of conflict and competition for food is simply not worth it. This instinct is the foundation of a clever, low-cost deterrent: a fake wasp nest. A simple decoy, hung early in the season, can redirect a queen to someone else’s yard before she ever unpacks her wings. The best part? You can make one in three straightforward steps using items you probably already have at home.
Why a Fake Wasp Nest Works
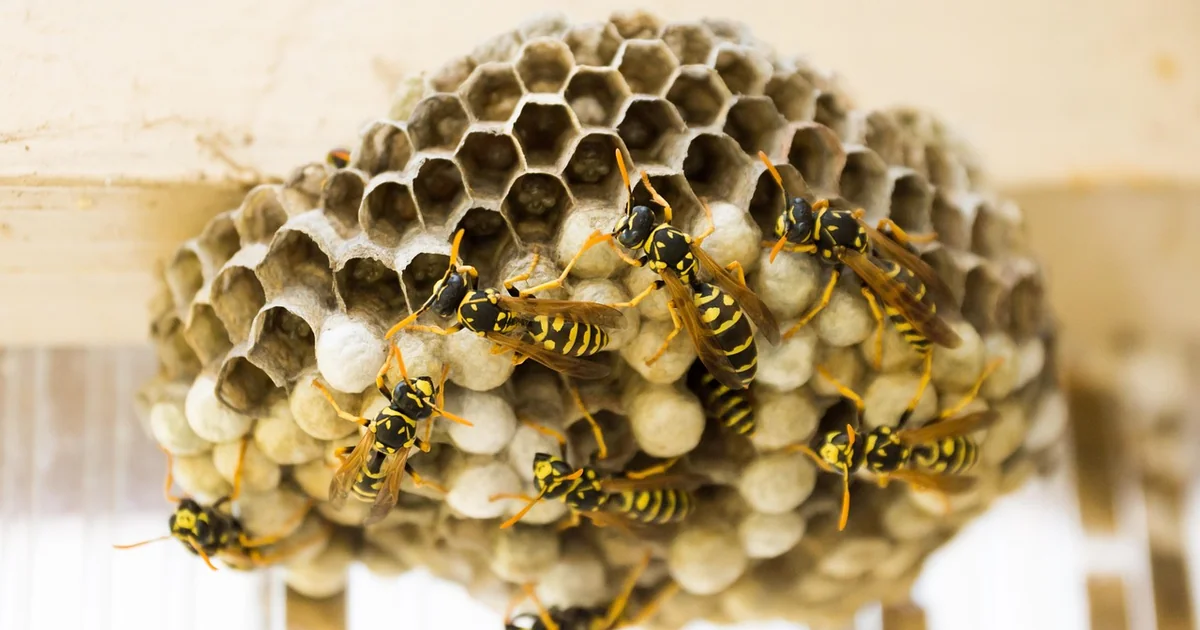
Social wasp species like yellowjackets, paper wasps, and several hornets share a common behavior. They avoid establishing a new colony within roughly 20 feet (about 6 meters) of an existing nest. The reason is evolutionary pragmatism. Two colonies in the same small territory would compete for the same flying insects, nectar, and sheltered spots. The inevitable skirmishes would cost both colonies workers and energy. Natural selection has favored wasps that read a nearby nest as a clear signal: “this patch is taken.”
A fake wasp nest exploits that exact signal. When a queen emerges from hibernation in early spring, she spends several weeks scouting potential nesting sites. She is not conducting a detailed inspection. Her visual survey is quick and rough. If she spots a grayish, papery, oval structure in a sheltered spot, her brain interprets it as an active colony. She moves on to find a less crowded neighborhood. This is not a solution for an existing infestation. It is a preventative measure that works only during the scouting window.
Making a convincing decoy takes less than ten minutes. The materials are cheap, and the technique requires no special skills. Here is the step-by-step method.
Step 1: Gather Your Materials
You will need a standard brown paper lunch bag. These are available at any grocery store or online. You also need something to stuff it with. Crumpled newspaper works well. Plastic grocery bags also work, though they make the decoy lighter and more prone to blowing in the wind. A piece of twine or string about 18 inches long is necessary for hanging. Optional but helpful: gray or brown craft paint, a permanent marker, or a few pencil strokes to add texture.
Step 2: Shape the Decoy
Open the paper bag and stuff it with crumpled newspaper until it holds a rough oval shape. Aim for something similar to the elongated teardrop profile of a real hornet nest. Do not overstuff. The bag should feel firm but slightly pliable. Gather the open end and twist it closed. Tie it off with the twine, leaving enough length to hang. Now comes the crucial part: crinkle and scrunch the entire outer surface. You want to lose the flat, crisp look of a new bag. The surface should appear grayish, papery, and irregular. Real nests are not smooth. If you have gray paint, dab a few streaks across the surface. A few pencil marks suggesting the papery cell pattern can help, but research indicates that fine detail is not necessary. Scout wasps respond to the overall shape and general texture, not the exact pattern of hexagonal cells.
Step 3: Hang It in the Right Spot
Placement is as important as the decoy itself. The fake wasp nest must be visible from a distance but sheltered from direct rain. An ideal location is under a porch eave, a deck overhang, a patio umbrella rib, or a pergola beam. If you have a specific corner where wasps have nested in previous years, hang the decoy there. Do not tuck it behind a pot or under dense foliage. The whole point is that a passing scout can see it clearly. Hang one decoy per potential nesting zone. If your patio has two corners where wasps could attach a nest, hang one in each. Space them about 20 feet apart if you are covering a larger area. Clustering multiple decoys in one spot reduces their effectiveness.
You may also enjoy reading: 5 Easy Step-by-Step Home Organization Tips.
Why Timing Matters More Than the Decoy Itself
The fake wasp nest strategy works only on scouting queens, not on established colonies. Queens emerge from hibernation in early spring. They spend a few weeks feeding and then begin searching for nest sites. This window typically runs from early April through May in most temperate climates. If you hang the decoy after a colony has already started building, the workers will eventually investigate it, realize it is not real, and ignore it. By then, the deterrent has already failed. The nest is built, and the decoy is just decoration. The rule is simple: get it up early or do not bother. In most regions, that means sometime in March or early April at the latest. If you live in a warmer climate where wasps start earlier, adjust accordingly. A good rule of thumb is to hang the decoy when you first see a single wasp flying around your porch or eaves. That is likely a scouting queen.
Where to Place Your Fake Nest for Maximum Effect
Visibility and shelter are the two non-negotiable factors. A decoy that gets soaked by rain will lose its shape and its convincing appearance. A decoy that is hidden behind a gutter or under thick leaves might as well not exist. The sweet spot is a location that is out of the rain but open to the air. Under the eaves of a house is classic. Under a deck overhang is excellent. On a pergola beam near the center of the patio works well. If you have a shed or a garage with eaves, those are prime spots too. One decoy per potential nesting zone is sufficient. Do not place them too close together. The 20-foot deterrence radius is a rough guide, but it is a useful starting point. If your porch is 30 feet long, two decoys at opposite ends cover the space better than one in the middle. Remember that the decoy is a visual signal. It must be the first thing a scout sees when she flies under your eaves.
When a Paper Bag Isn’t Enough
A brown paper bag decoy has a limited lifespan. Rain, wind, and sun will degrade it over a few weeks. The paper becomes soft, the shape collapses, and the surface loses its nest-like texture. If you hang one in early April, it may look convincing for about a month. That is usually enough to cover the scouting window. But if you want a longer-lasting solution, consider alternatives. Commercial fake wasp nests made from weather-resistant materials are available online. They are often made of plastic or resin and painted to mimic the papery texture. They cost a bit more but last for years. Another option is a crocheted decoy. Some crafters make wool or cotton nests that hold their shape and repel moisture. A crocheted nest can be hung and left up all season without worrying about rain damage. If you choose the paper bag route, plan to replace it if it gets soggy or misshapen. A torn, flattened bag is worse than no decoy because it does not trigger the territorial response.
Common Mistakes and How to Avoid Them
The most common mistake is hanging the decoy too late. As mentioned, once a colony is established, the decoy is useless. Another mistake is hanging it in a spot that is too hidden. A decoy tucked behind a downspout or under a dense shrub will not be seen by a scout. A third mistake is using a bag that looks too clean and smooth. A brand-new lunch bag with crisp folds does not resemble a wasp nest. You must rough it up. A fourth mistake is hanging multiple decoys in the same small area. One decoy per zone is enough. Clustering them does not increase deterrence and may even confuse the scout. Finally, do not forget that the fake wasp nest is a preventative tool, not a treatment. If you already have an active nest, call a pest control professional or use an appropriate insecticide. The decoy will not make an existing colony leave.
A well-made decoy, hung early and placed visibly, is one of the most cost-effective ways to keep wasps from building on your property. The three steps are simple, the materials are cheap, and the payoff is a summer with fewer stinging insects around your outdoor spaces. Get the bag up before the queens start scouting, and let their own territorial instincts do the work for you.


